In this guide, we’ll delve into best practices for form submission in WordPress, exploring strategies to tighten security and optimize the performance of your forms. Through practical code examples and actionable tips.
1. Potential security risks related to form submissions
When it comes to form submissions in WordPress, ensuring the security of user data is paramount. Several potential security risks are associated with form submissions that can compromise the integrity of your website and user information. These risks include:
- Form Tampering: Malicious users may attempt to manipulate form data before it is submitted, leading to unauthorized changes or unintended actions.
- Cross-Site Request Forgery (CSRF): This type of attack occurs when a malicious site tricks a user’s browser into making an unintended request, potentially leading to unauthorized actions on the user’s behalf.
- SQL Injection: Attackers may try to inject malicious SQL code through form fields, exploiting vulnerabilities in the database and gaining unauthorized access to sensitive information.
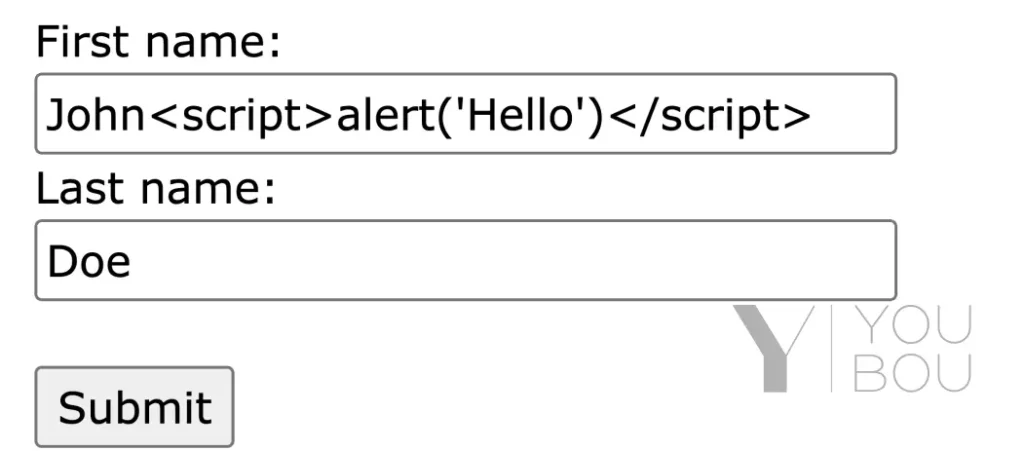
- Data Validation Bypass: Without proper validation, users can submit malformed or malicious data, potentially causing unexpected behavior or security vulnerabilities.
2. Utilizing nonce fields to prevent form tampering and Cross-Site Request Forgery (CSRF)
To mitigate the risks mentioned above, WordPress provides a security mechanism known as nonces (number used once). Nonces are unique tokens generated for each user and form interaction, ensuring that the submitted data originates from the expected source and has not been tampered with.
In this example, the wp_nonce_field function adds a nonce field to the form.
<form action="" method="post">

    <input type="text" name="first_name">
    <input type="text" name="last_name">
    <input type="email" name="email">

    <button type="submit">Save</button>
    <?php wp_nonce_field( 'my_submit_form_action', '_my_form_nonce' ); ?>

</form>
And wp_verify_nonce checks the nonce when processing the form submission.
function youbou_handle_form_submission() {

    $nonce = $_POST['_my_form_nonce'] ?? '';

    if ( ! wp_verify_nonce( $nonce, 'my_submit_form_action' ) ) {
        return;
    }

    // Validate & sanitize data

}
add_action( 'init', 'youbou_handle_form_submission' );
3. Implementing input validation and sanitization to prevent malicious input
Beyond nonce fields, input validation and sanitization are crucial for preventing malicious input and potential vulnerabilities. WordPress provides functions for validating and sanitizing data, ensuring that only the expected and safe data types are processed.
function youbou_handle_form_submission() {

    $nonce = $_GET['_my_form_nonce'] ?? '';

    if ( ! wp_verify_nonce( $nonce, 'my_submit_form_action' ) ) {
        return;
    }

    // Get data
    $first_name = isset($_POST['first_name']) ?? '';
    $last_name  = isset($_POST['last_name']) ?? '';
    $email      = isset($_POST['email']) ?? '';

    // Sanitize data
    $first_name = sanitize_text_field($first_name);
    $last_name  = sanitize_text_field($last_name);
    $email      = sanitize_email($email);

    // Validate data
    if ( empty($first_name) ) {
        $errors[] = 'First name is required';
    }

    if ( empty($last_name) ) {
        $errors[] = 'Last name is required';
    }

    if ( empty($email) || !is_email($email) ) {
        $errors[] = 'Email is required';
    }

}
add_action( 'init', 'youbou_handle_form_submission' );
4. Accessibility Considerations
Ensure that you’re using semantic HTML elements for form structure. Use <form>, <fieldset>, <legend>, <label>, and appropriate input types to convey the purpose of each form element to assistive technologies.
<form>
  <fieldset>
    <legend>Contact Information</legend>
    <label for="name">Name:</label>
    <input type="text" id="name" name="name" required>
    <!-- Other form fields go here -->
  </fieldset>
</form>
Provide clear and concise labels for each form field. The label should be descriptive enough to convey the purpose of the field. Avoid using placeholder text as a substitute for labels.
<label for="email">Email Address:</label>
<input type="email" id="email" name="email" required>
Implement ARIA landmarks to define the regions of your form, making it easier for screen readers to navigate. Use roles like role="form" and role="region".
<form role="form">
  <div role="region" aria-labelledby="formTitle">
    <h2 id="formTitle">Contact Information</h2>
    <!-- Form fields go here -->
  </div>
</form>
When displaying error messages, associate them with the corresponding form field and use ARIA attributes to communicate the error state.
<label for="password">Password:</label>
<input type="password" id="password" name="password" aria-invalid="true" aria-describedby="passwordError">
<div id="passwordError">Please enter a valid password</div>