When it comes to selling products online, offering accessory options can greatly enhance the customer experience.
Showcasing related accessories on a single product page allows customers to explore additional items that complement their purchase, increasing the chances of upselling and cross-selling. By presenting accessories in a strategic manner, businesses can provide a convenient and seamless shopping experience for their customers.
1. Add a multiselect field in the linked products tab
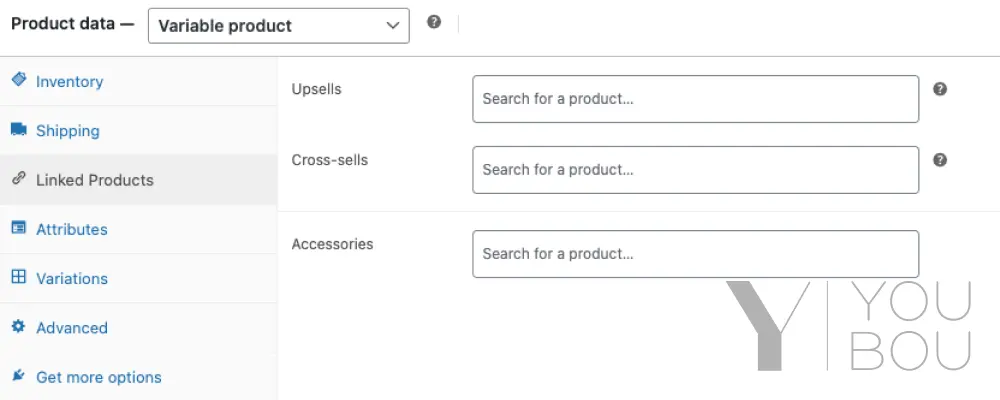
I am planning to enhance the functionality of the Linked Products tab by adding a new field. This field will enable the admin to conveniently select the accessories associated with a particular product. To achieve this, I will utilize the powerful multiselect feature offered by WooCommerce.
<?php
add_action( 'woocommerce_product_options_related', function(){
    global $post;

    ?>
        <div class="options_group">
            <p class="form-field">
                <label for="accessories_ids"><?php _e( 'Accessories', 'text-domain' ); ?></label>
                <select class="wc-product-search" multiple="multiple" style="width: 50%;" id="accessories_ids" name="accessories_ids[]" data-placeholder="<?php esc_attr_e( 'Search for a product…', 'text-domain' ); ?>" data-action="woocommerce_json_search_products_and_variations" data-exclude="<?php echo intval( $post->ID ); ?>">
                    <?php
                        $product_ids = get_post_meta( $post->ID, 'accessories_ids', true );
                        $product_ids = is_array( $product_ids ) ? $product_ids : array();

                        foreach ( $product_ids as $product_id ) {
                            $product = wc_get_product( $product_id );
                            if ( is_object( $product ) ) {
                                echo '<option value="' . esc_attr( $product_id ) . '"' . selected( true, true, false ) . '>' . esc_html( wp_strip_all_tags( $product->get_formatted_name() ) ) . '</option>';
                            }
                        }
                    ?>
                </select>
            </p>
        </div>
    <?php
});
2. Save accessories in post meta
Secondly, I will store the product accessories in a post meta for future utilization.
add_action( 'woocommerce_process_product_meta', function( $post_id ){

    if( isset( $_POST['accessories_ids'] ) ){

        $product_field_type =  $_POST['accessories_ids'];

        if( ($key = array_search( $post_id, $product_field_type)) !== false) {
            unset($product_field_type[$key]);
        }

        update_post_meta( $post_id, 'accessories_ids', $product_field_type );

    }else{
        update_post_meta( $post_id, 'accessories_ids', array() );
    }

});
3. Presenting the accessories alongside the product
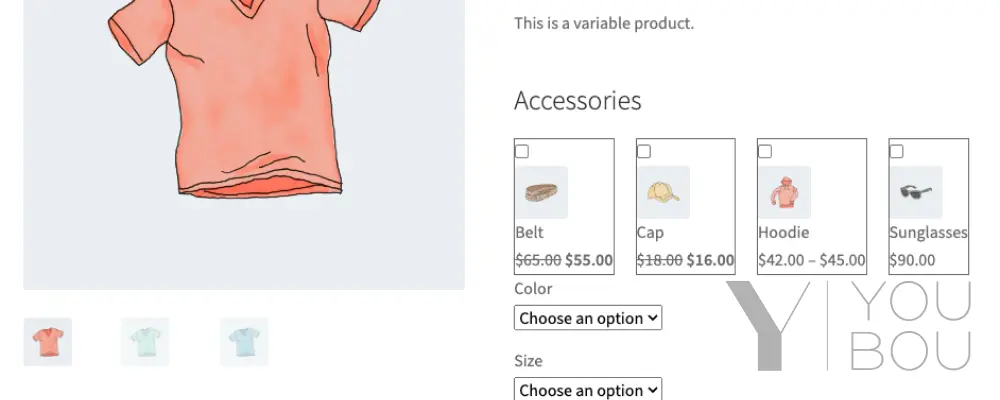
The third step involves presenting the accessories alongside the product, allowing users to select their desired options. It is crucial to include these accessories within the variation form if the product is variable. For instance, in the provided example, utilizing the woocommerce_before_add_to_cart_button hook would be suitable for a simple product.
<?php
add_action( 'woocommerce_before_variations_form', function(){
    global $product;

    $product_id         = $product->get_id();
    $accessories_ids     = get_post_meta( $product_id, 'accessories_ids', true );
    $accessories_count   = is_array( $accessories_ids ) ? count( $accessories_ids ) : 0;

    if ( $accessories_count < 1 ) {
        return;
    }

    ?>
        <div class="product-accessories">

            <h3 class="product-accessories-title"><?php _e( 'Accessories', 'text-domain'); ?></h3>

            <div class="product-accessories-body" style="display:flex;gap:20px">

                <?php
                    foreach ( $accessories_ids as $accessory_id ) {

                        $accesorie_product = wc_get_product($accessory_id);

                        if ( !$accesorie_product ) {
                            continue;
                        }

                        if ( !$accesorie_product->is_in_stock() ) {
                            continue;
                        }

                        $image  = $accesorie_product->get_image();
                        $title  = $accesorie_product->get_title();
                        $price  = $accesorie_product->get_price_html();

                        ?>
                            <label class="product-accessories-body-item" style="border: 1px solid;">
                                <input class="product-accessories-body-checkbox" type="checkbox" name="product-accessories[<?php echo esc_attr($accessory_id); ?>]">

                                <div class="product-accessories-body-item-content">
                                    <div class="product-accessories-body-item-image" style="width: 50px;"><?php echo $image; ?></div>
                                    <div class="product-accessories-body-item-title"><?php echo esc_html($title); ?></div>
                                    <div class="product-accessories-body-item-price"><?php echo wp_kses_post($price); ?></div>
                                </div>
                            </label>
                        <?php
                    }
                ?>
            </div>
        </div>
    <?php

});
4. Add accessories to the cart
To ensure that the selected accessories are added to the cart, I will utilize the woocommerce_add_to_cart_redirect hook.
add_filter( 'woocommerce_add_to_cart_redirect', function( $url ){

    if ( ! isset( $_REQUEST['add-to-cart'] ) || ! isset( $_REQUEST['product-accessories'] ) ) {
        return $url;
    }

    $accessories_ids = is_array( $_REQUEST['product-accessories'] ) ? $_REQUEST['product-accessories'] : array();

    global $already_added_accessories;
    if ( is_null( $already_added_accessories ) ) {
        $already_added_accessories = true;

        foreach ( $accessories_ids as $accessory_id => $value ) {
            WC()->cart->add_to_cart( $accessory_id, 1 );
        }
    }

    return $url;
});